
Fiber Internet with Your Own Firewall: Does It Work Without Bridge Mode?
05 October 2026 · Rolf
Connect your own firewall directly to fiber internet – reliable and affordable? CGNAT and ISP routers without bridge mode can get in the way. Discover a simple solution using Teleboy and a media converter. Use my referral code HOME-TAFA7JUG to get CHF 50 credit.
Teleboy: An Ideal Solution
With Teleboy, I can connect my own firewall directly to the fiber network using a media converter:
- Public IPv4 without CGNAT: Accessible from outside my network for VPN connections, remote access and self-hosted services.
- No additional ISP router: The media converter replaces the FRITZ!Box – without bridge mode or double NAT.
- Compact and affordable: The media converter takes up little space and connects fiber to Ethernet.
- Full control: I manage routing, firewall rules, VPN connections and port forwarding on my own firewall.
- Reliable network infrastructure: Teleboy provides internet access through iWay’s infrastructure on the Swisscom fiber network.
This setup applies to my AON fiber connection with speeds up to 1 Gbit/s. It cannot be used unchanged on an XGS-PON connection.
For my experience with ordering, installation and support, along with Teleboy’s general benefits, read my first Teleboy review.
Fiber Internet with Your Own Firewall
The Problem: No Bridge Mode
Finding an affordable internet connection suitable for remote access is harder than expected. Many plans do not include a public IPv4 address or use CGNAT. This prevents direct incoming IPv4 connections for VPN access and self-hosted services. Teleboy provides a public IPv4 address on my connection – but the supplied FRITZ!Box does not support bridge mode.
The Solution: A Media Converter
There is no need to buy another router just for bridge mode. A media converter converts the optical fiber signal into an electrical Ethernet signal for the RJ45 port on your own firewall.
This solution is affordable, compact and energy-efficient. Your own firewall handles all network functions, and the FRITZ!Box is no longer needed.
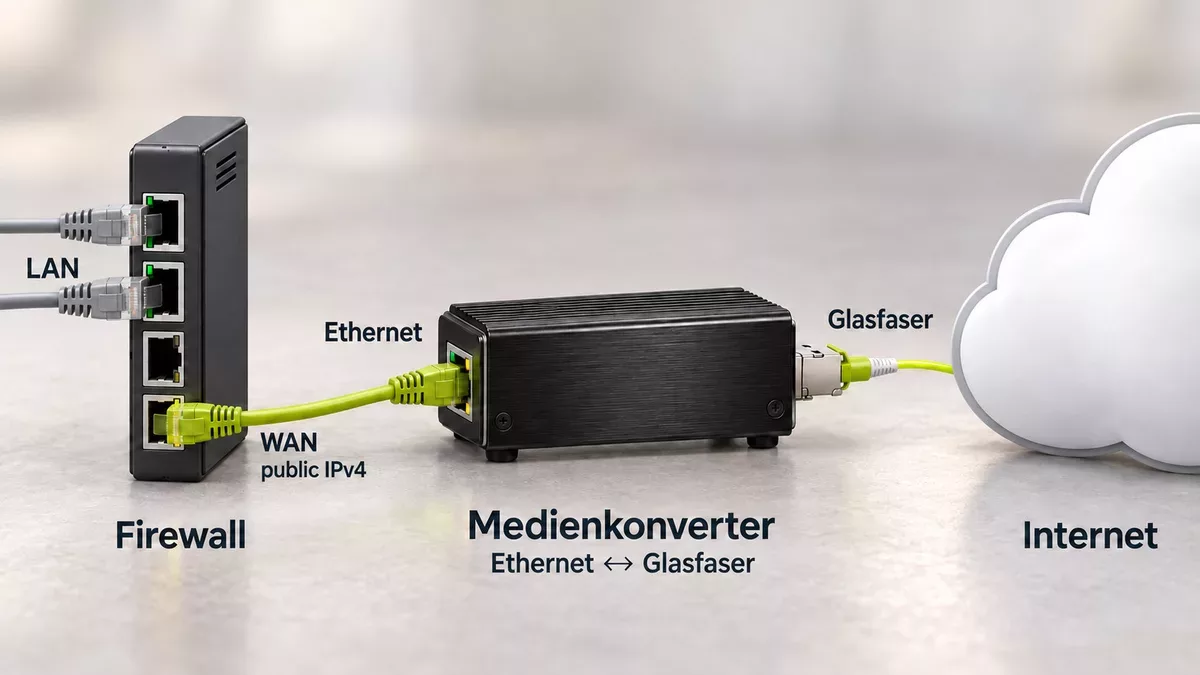
The Media Converter I Chose
My priorities were a compact design, a low price and minimal power consumption. I also wanted USB or PoE power without a separate power adapter. I power my media converter directly from the firewall’s USB port.
You only need the media converter without an SFP module – simply remove the FRITZ!SFP AON module from the FRITZ!Box and insert it into the media converter.
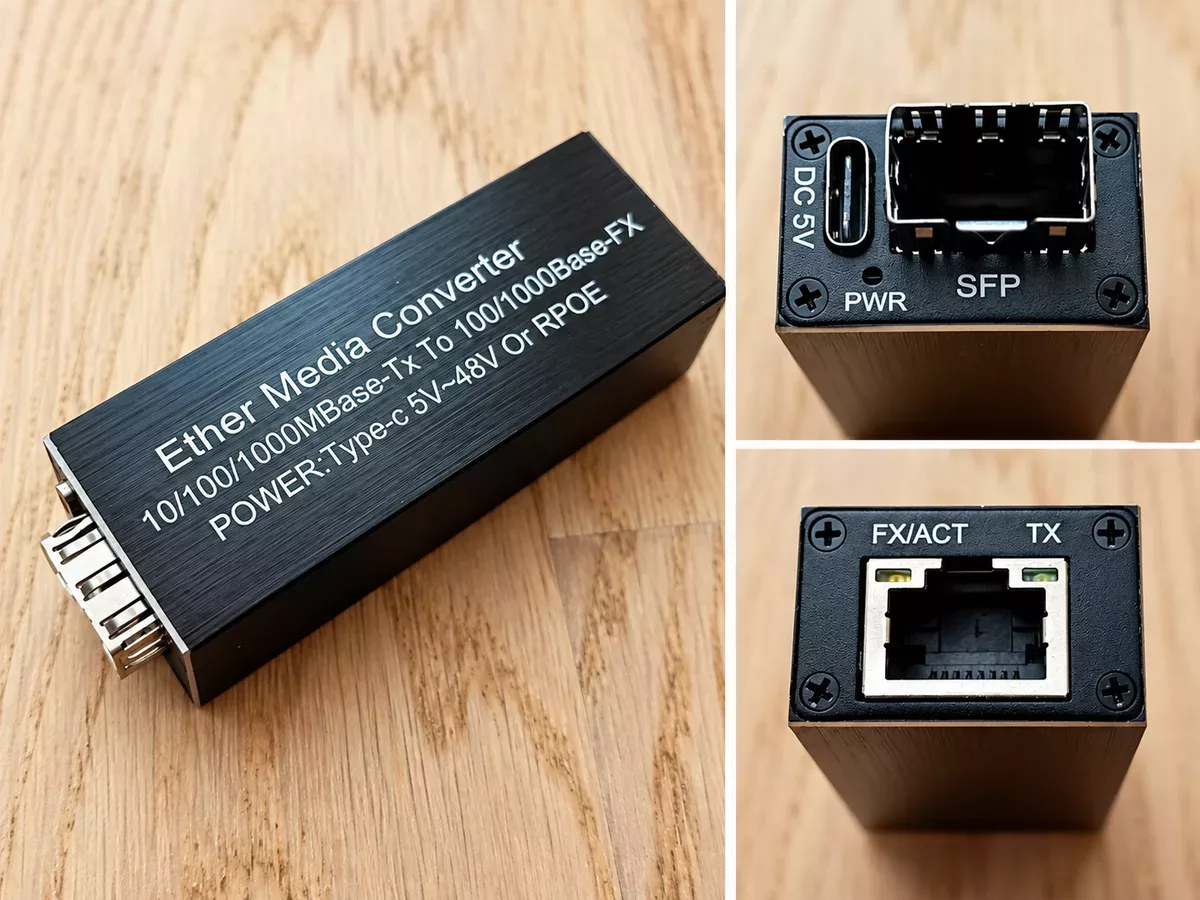
Installing the Media Converter
I tested this setup on an AON fiber connection with speeds up to 1 Gbit/s. I recommend setting up the FRITZ!Box first and checking the internet connection. This confirms that your connection works before you switch to your own firewall. I describe the initial setup in my Teleboy review.
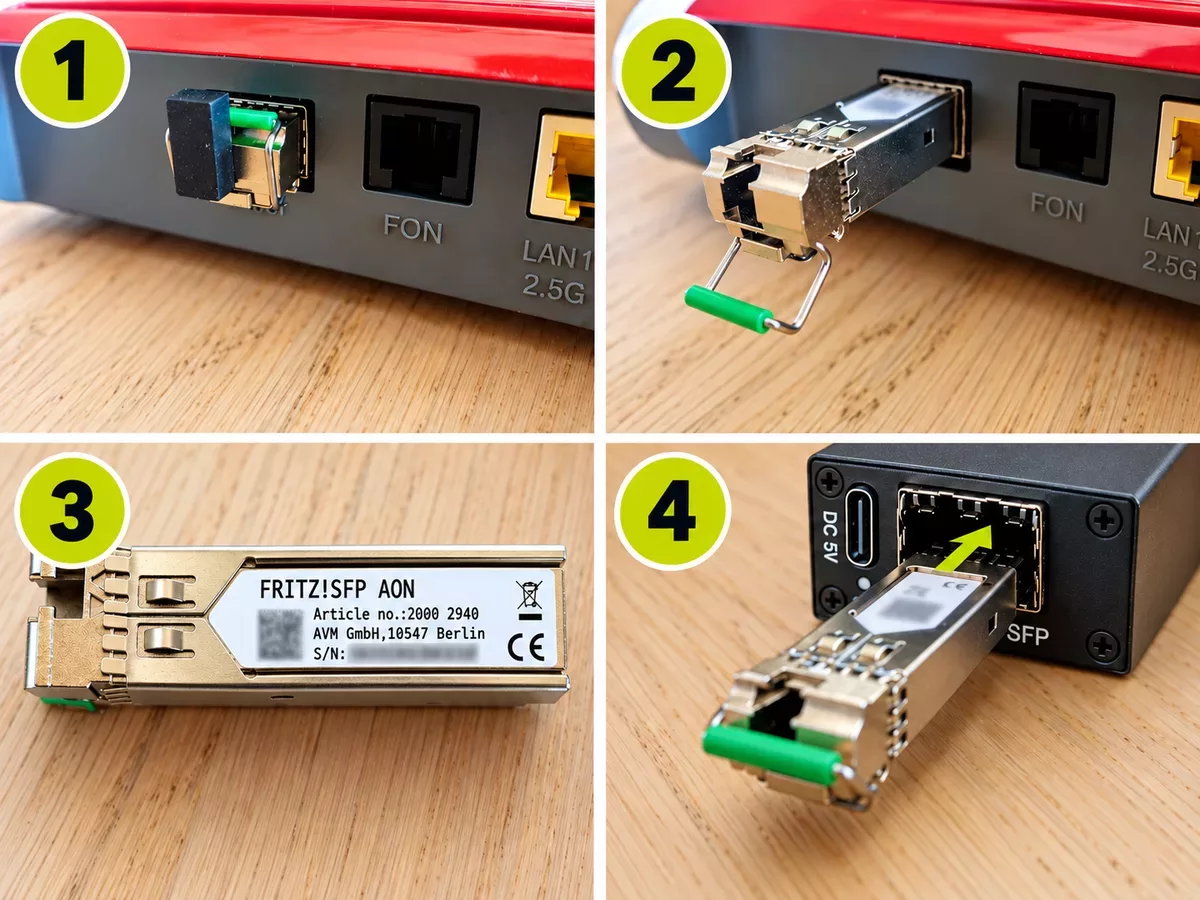
Move the SFP Module
Disconnect the FRITZ!Box from power and carefully unplug the fiber cable from the SFP module. Then remove the FRITZ!SFP AON module from the FRITZ!Box and insert it into the powered-off media converter until it clicks into place.
Connect the Cables
Connect the fiber wall socket to the SFP module in the media converter, then connect the converter’s Ethernet port to your firewall’s WAN port. Finally, connect the USB power cable. Alternatively, you can power the media converter through a compatible PoE connection, eliminating the need for the USB cable.
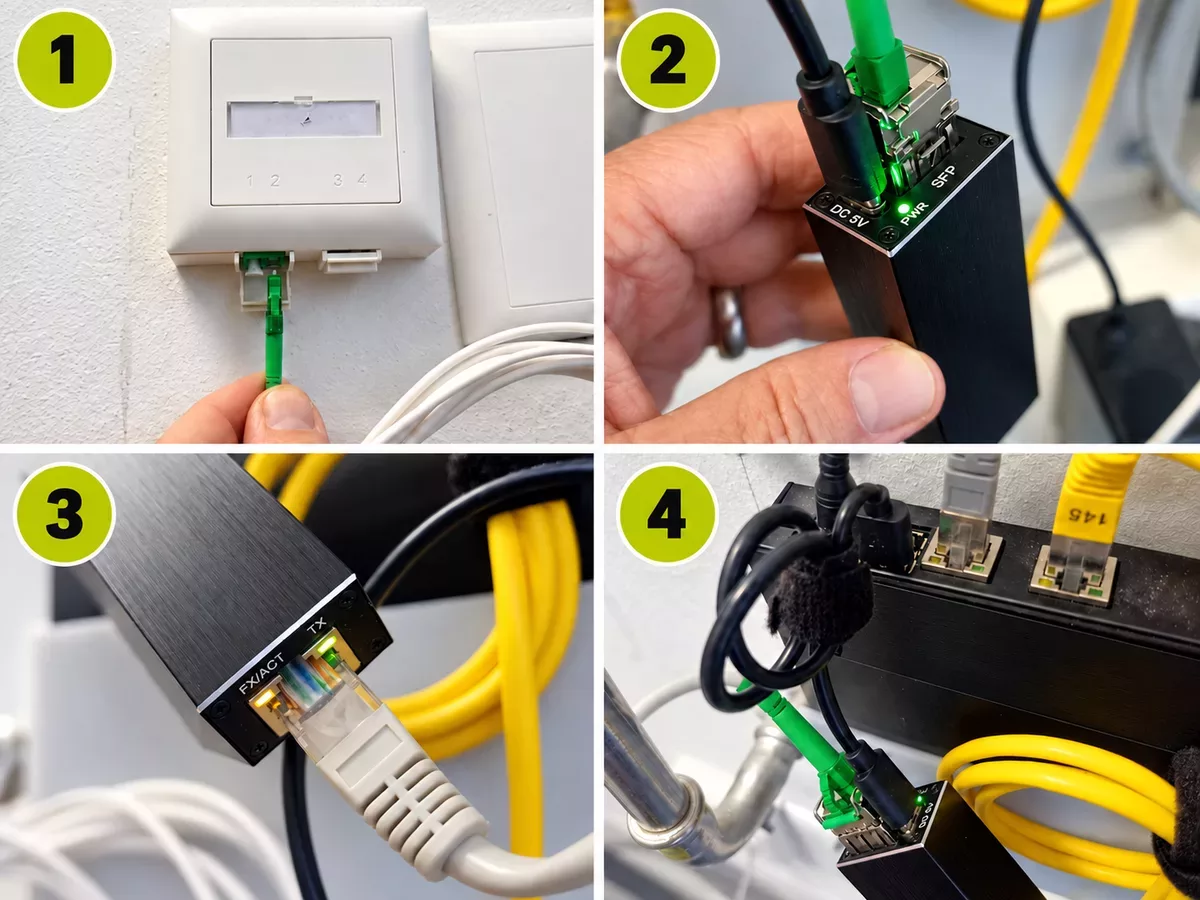
When the connection is active, the light green LED on the fiber side lights up. At the Ethernet port, FX/ACT lights up yellow and TX green.
The Complete Setup
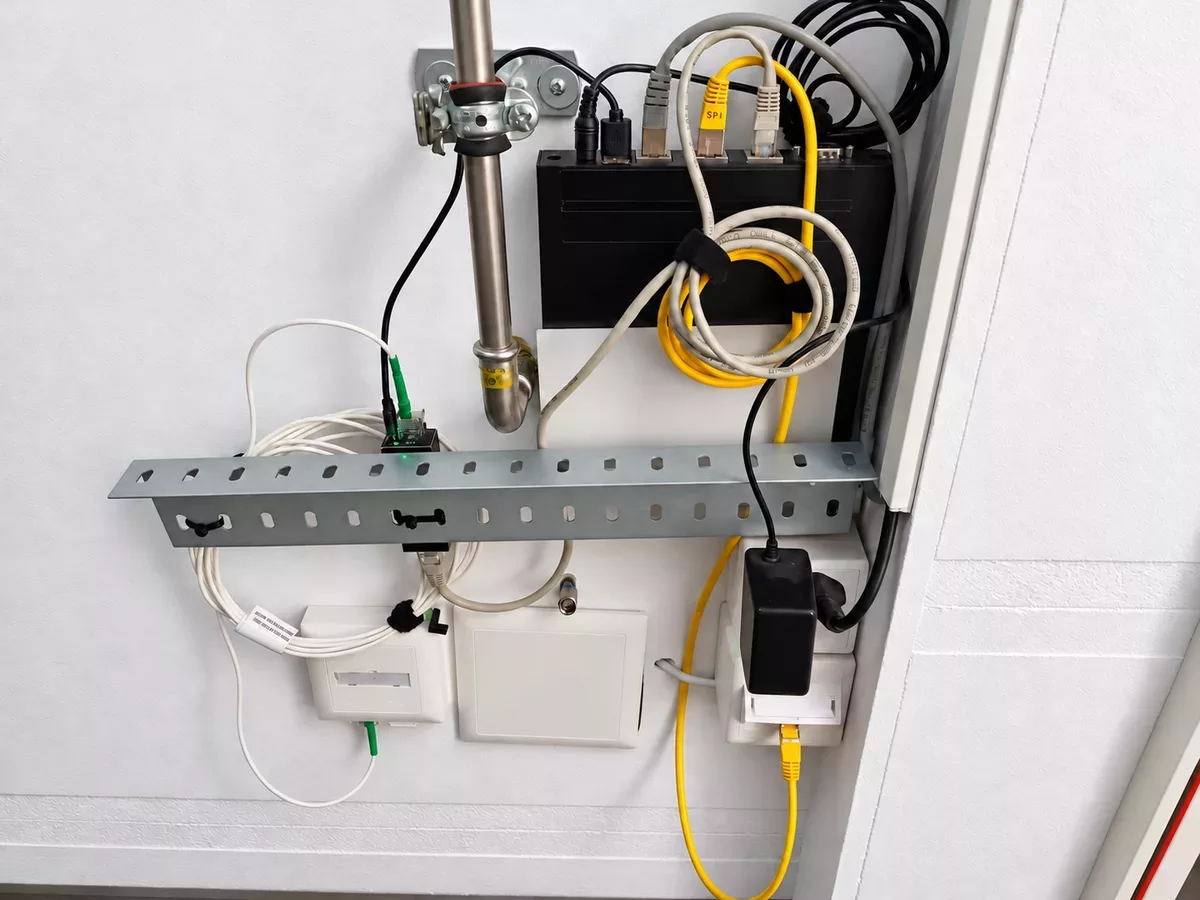
Note: The AON module gets hot during operation and transfers heat to the media converter’s metal housing. To help dissipate the heat, I attached the media converter to a standard metal profile from a hardware store using cable ties. This simple solution works very well.
Configuring the Firewall
The WAN connection must use VLAN 10. Without this VLAN, the interface will not receive an IPv4 address via DHCP.
Online sources give conflicting advice about additional DHCP settings. On my connection, these are not required. This made finding a working configuration more difficult. The DHCP lease adds another complication: an existing assignment can remain tied to the previous router’s MAC address for some time, delaying the switch to the firewall. Initially, it was unclear whether my settings were wrong or the previous lease had simply not been released yet.
I use an OPNsense firewall on my network. The following steps describe the configuration in OPNsense.
Create VLAN 10
Create a new entry under Interfaces > Devices > VLAN. Select the physical port connected to the media converter (WAN) as the parent device and enter 10 as the VLAN tag. Leave the VLAN priority at its default value of 0. Save and apply the changes.
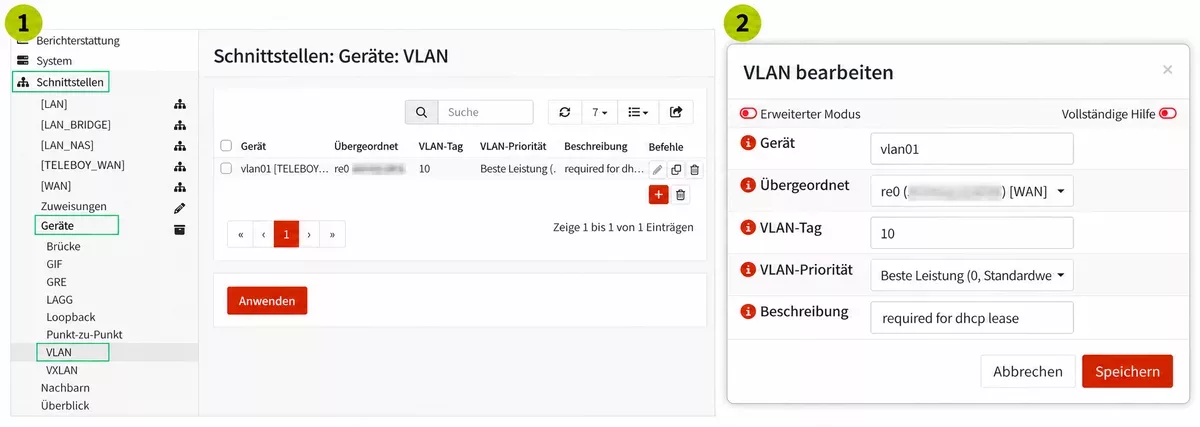
Enable the WAN Interface
Rename the VLAN interface to TELEBOY_WAN, enable it and select DHCP as the IPv4 configuration type. Then disable the previous WAN interface. Save the settings, apply the changes and restart the firewall.
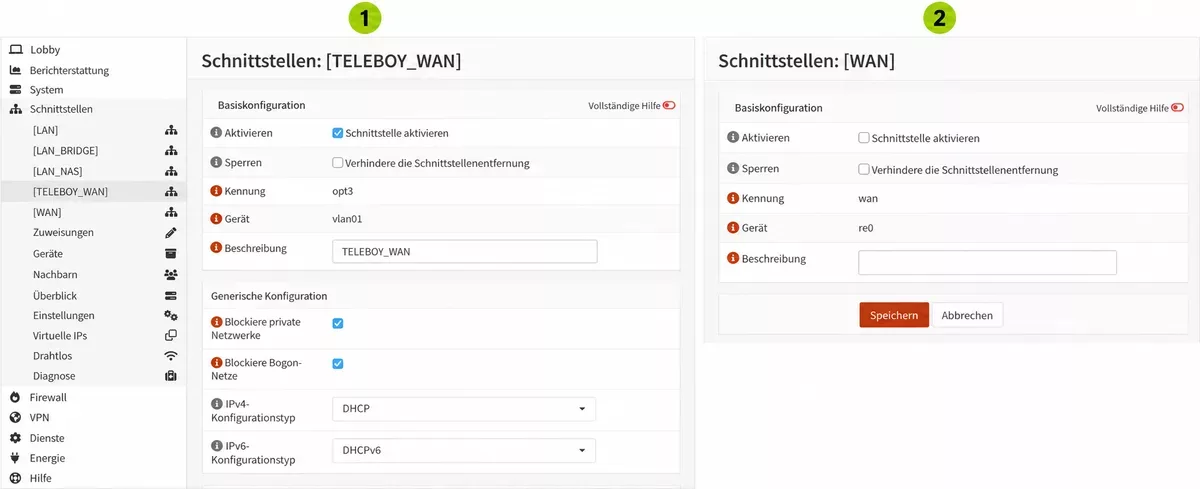
3.3 Check the Connection
Check the connection under Interfaces > Overview. The TELEBOY_WAN interface should now show a public IPv4 address assigned via DHCP.
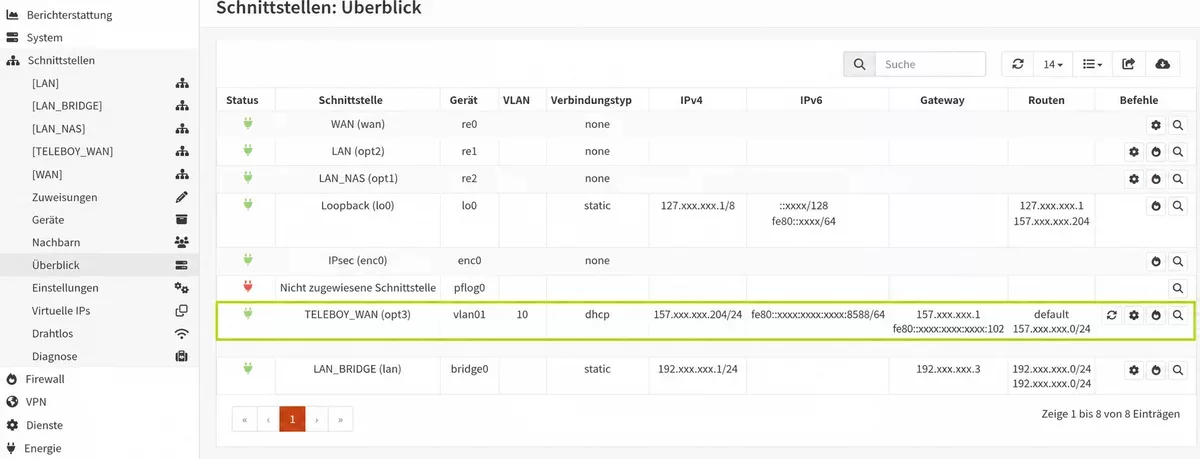
My Verdict: Teleboy with Your Own Firewall
Since completing the setup, my experience with Teleboy has remained entirely positive: an affordable internet plan, a stable connection, a public dynamic IPv4 address and a support team that answers technical questions quickly and competently.
Before ordering, I had not worked out every detail of the firewall and media converter setup. Once you know what is needed, however, it is surprisingly straightforward. That is why I wrote this guide – to help technically experienced users get connected faster without repeating the same research.
For me, Teleboy is a particularly appealing option if you want control over your connection, need remote access or run your own firewall. My public IPv4 address has rarely changed so far, which is another practical benefit.
Thinking of switching to Teleboy? Enter my referral code HOME-TAFA7JUG when ordering. We will both receive CHF 50 credit.
What Other Customers Say
Other technically experienced users also report positive experiences with Teleboy, including support for their own hardware, stable connections, helpful support and impressive performance.
“Above all, you can use your own router without any problems. The speed is better than expected, and everything runs reliably.”
“Very stable internet, and when support was needed on one occasion, it was available right away.”
“It’s been running perfectly for two months. Speed and ping times are great too! Support was quite knowledgeable and helpful.”
“Stable internet, few to no outages. The supplied modem (FritzBox) is excellent and quick to set up.”
